How to Draw an Arabic Mehndi Design at Home (Step-by-Step)
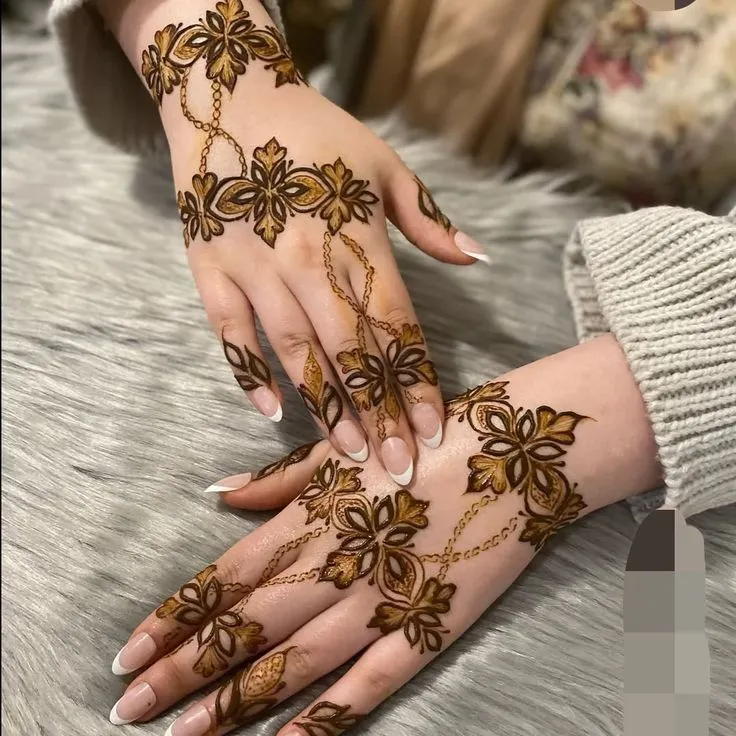
You can draw a simple Arabic mehndi design at home with just a henna cone and a bit of practice. This guide walks through six steps, the tools you need, and the mistakes beginners make most often. It’s built for someone trying this for the first time, not a professional artist.
What You’ll Need
- A henna cone, either store-bought or hand-rolled
- A steady surface to rest your wrist, such as a table or your own knee
- Tissue or a damp cloth for cleanup
- Paper and a pen for practising the design first
- One of the beginner Arabic mehndi designs from our design guide
If you’re using a store-bought cone, check that the tip opening matches the line thickness you want. A finer tip suits detail work; a wider one suits bold outlines.
Before You Start: Practise on Paper
Draw your chosen design on paper first, especially if it includes a rose or a paisley. This isn’t about the drawing looking perfect. It’s about training your hand to make the shape before you commit it to skin, where mistakes are harder to fix. Ten minutes of paper practice saves far more time than it costs.
Step 1: Set Up Your Position
Rest your wrist on a table or your knee rather than holding your arm in the air. A steady base matters more than a steady hand. Most wobbly lines come from an unsupported arm, not from shaky fingers.
Sit somewhere with good light, and keep your working hand at a comfortable angle so you’re not straining to see the design as you go.
Step 2: Draw the Main Line First
Most Arabic designs start with one main stem or bel, the diagonal vine that gives the style its shape. Draw this line in a single smooth pull rather than short, broken strokes. Hold the cone at a low angle to the skin and keep your speed even from start to finish.
This is the step worth slowing down for. A shaky main line is more noticeable than an uneven flower later on, since it’s usually the longest single line in the whole design.
Step 3: Add the Largest Motif
Once the main line is down, add the biggest flower or paisley along it. Placing the largest shape first gives you a fixed point to measure everything else against. If you add small details before the main shapes, you risk running out of space or crowding the design.
Step 4: Fill in Smaller Details
Now add the smaller elements: leaves, dots, and any secondary flowers. Doing this last lets you adjust the spacing around shapes that are already in place, instead of guessing where they’ll go ahead of time.
Step 5: Leave Space on Purpose
Resist the urge to fill every gap. Open, bare skin is part of what makes a design read as Arabic rather than Indian. If it looks unfinished to you, that’s normal. The space is doing its job.
If you’re used to denser mehndi styles, this is the step where beginners most often go wrong by adding extra fill just to feel like they’ve done enough.
Step 6: Let It Dry Undisturbed
Wet henna paste smudges easily. Keep your hand still for the first few minutes after finishing, and avoid touching nearby surfaces or clothing until the paste has visibly set.
Common Mistakes and How to Fix Them
Pressing too hard on the cone. This pushes out too much paste at once, making lines thicker than planned. Use steady, light pressure, and practise controlling flow on paper before you start on skin.
Dragging the cone tip against the skin. Pressing the tip directly onto the skin instead of holding it just above tends to blunt fine lines and cause smudging. A small gap between the tip and the skin gives you cleaner lines.
Rushing the main line. Slow down on the stem or bel, even if you speed up on the smaller details later. It’s the line every other part of the design is measured against.
Filling in gaps out of habit. If your instinct is to keep adding until the skin is covered, stop and compare your work to a finished reference photo. Leaving skin bare is a deliberate part of this style, not a step you forgot.
Moving your hand too soon. Even a small smudge on a diagonal line is hard to fix once it happens. Give the paste a few extra minutes to set before doing anything else with that hand.
How Long Does This Take to Learn?
A simple mehndi design, like a single vine with a few leaves, is realistic for a first attempt. Designs with a rose, paisley, or dense filling take more practice, since the shapes rely on consistent pressure and spacing that come with repetition. Expect your first few tries to look rougher than the reference photo. That’s normal, and it improves quickly with practice.
Frequently Asked Questions
Do I need a special cone to draw Arabic mehndi designs?
No. A standard henna cone works for beginner designs. A finer tip helps with detail work later on, but it’s not necessary for your first attempt.
Can I use a stencil instead of freehand drawing?
Yes. Stencils are a reasonable way to start, especially for a symmetrical design. Most artists move to freehand once they’re comfortable with the basic shapes.
Why does my line come out shaky?
This is usually the arm, not the hand. Rest your wrist on a firm surface and keep your whole arm still, rather than trying to steady just your fingers.
How do I know if I’m using too much paste?
If the line spreads wider than you intended as soon as it touches the skin, you’re pressing too hard. Ease off the pressure and let the cone do the work.
